
Common Rubber Molding Defects and What They Reveal About Your Process
Every rejected part from a rubber molding run carries information. A thin line of flash along the parting line, a cluster of bubbles in a thick section, or a faint flow line near the gate isn’t just scrap to sort and discard. It’s a record of what happened inside the mold during that cycle, and reading it correctly is the fastest way to find out what step in your process needs attention.
Our earlier post on quality assurance in rubber molding covered how to prevent defects before they happen. This one works in the other direction. Below, we walk through the most common rubber molding defects, what each one typically reveals about your tooling, material, or process, and how the Moldtech team uses production data to trace a defect back to its root cause.
Why Rubber Molding Defects Are Clues, Not Just Scrap
Rubber behaves differently from thermoplastics. Thermoplastic scrap can often be reground and remolded, but rubber goes through vulcanization, an irreversible chemical reaction. Once a part cures, a defect is locked in. That makes every defect expensive, and it also makes every defect a reliable piece of evidence.
Most defects in injection molding trace back to one of four sources: the tooling, the process parameters, the material, or the part design. Figuring out which one is responsible usually comes down to four questions:
- Where on the part does the defect appear?
- When did it start: on the first shot, gradually over a run, or suddenly?
- Which parts are affected: every cavity, or just one?
- What changed: a material lot, a maintenance cycle, a machine, or a shift?
The pattern behind the answers often points to the root cause before anyone touches a machine setting.
| What You See | What It Usually Points To |
| The same defect in the same spot on every shot | Tooling: wear, damage, or a design feature at that location |
| A defect on only one cavity of a multi-cavity mold | Cavity imbalance or a problem specific to that cavity |
| A defect that gets gradually worse over a run | Residue buildup, heat creep, or an overdue mold cleaning |
| A defect that appears suddenly across all cavities | A process change or a new material lot |
Keep those patterns in mind as we look at the specific molding defects below.
Flash in Rubber Molding: What Excess Material Is Telling You
So, what is flash in injection molding? Flash is the thin layer of excess material that escapes the cavity and cures outside the part, usually along the parting line, at vents, around ejector pins, or where an insert meets the mold. In rubber molding, some flash is expected. Compression molds are often designed with overflow grooves, and many programs plan for rubber deflashing through trimming, tumbling, or cryogenic deflashing.
The diagnostic question isn’t whether a part has flash. It’s whether the flash has changed in thickness, location, or frequency. Here’s what different patterns of rubber flash usually reveal:
- Thin, feathery flash around the whole parting line. This points to the process. Injection pressure or shot volume may be too high, or clamp force may not be enough to hold the mold closed against it. A mold temperature that lowers compound viscosity before cure begins can have the same effect.
- Flash in one consistent location. This points to the tooling. A worn or nicked shutoff, a damaged parting line, or plates that aren’t seating evenly will produce mold flash in the same spot shot after shot.
- Flash that builds over the course of a run. This often means residue is collecting on the parting surfaces and keeping the mold from closing fully. A documented mold cleaning schedule, part of the process discipline we follow on every job, is the usual fix.
- Flash that shows up with a new material lot. A shift in compound viscosity or cure behavior between batches can change how readily material escapes the cavity.
When it comes to how to avoid flash in injection molding, the fix depends on the source. Turning down injection pressure to hide a worn tool may reduce flash for a while, but it can also cause underfilled parts. And relying on extra deflashing to clean up mold flashing adds labor and risks damaging the sealing edges on tight-tolerance parts. Solving it at the source, including parting line placement during DFM review, is almost always the better long-term answer.
Bubbles, Voids, and Blisters: Tracing Where the Air Came From
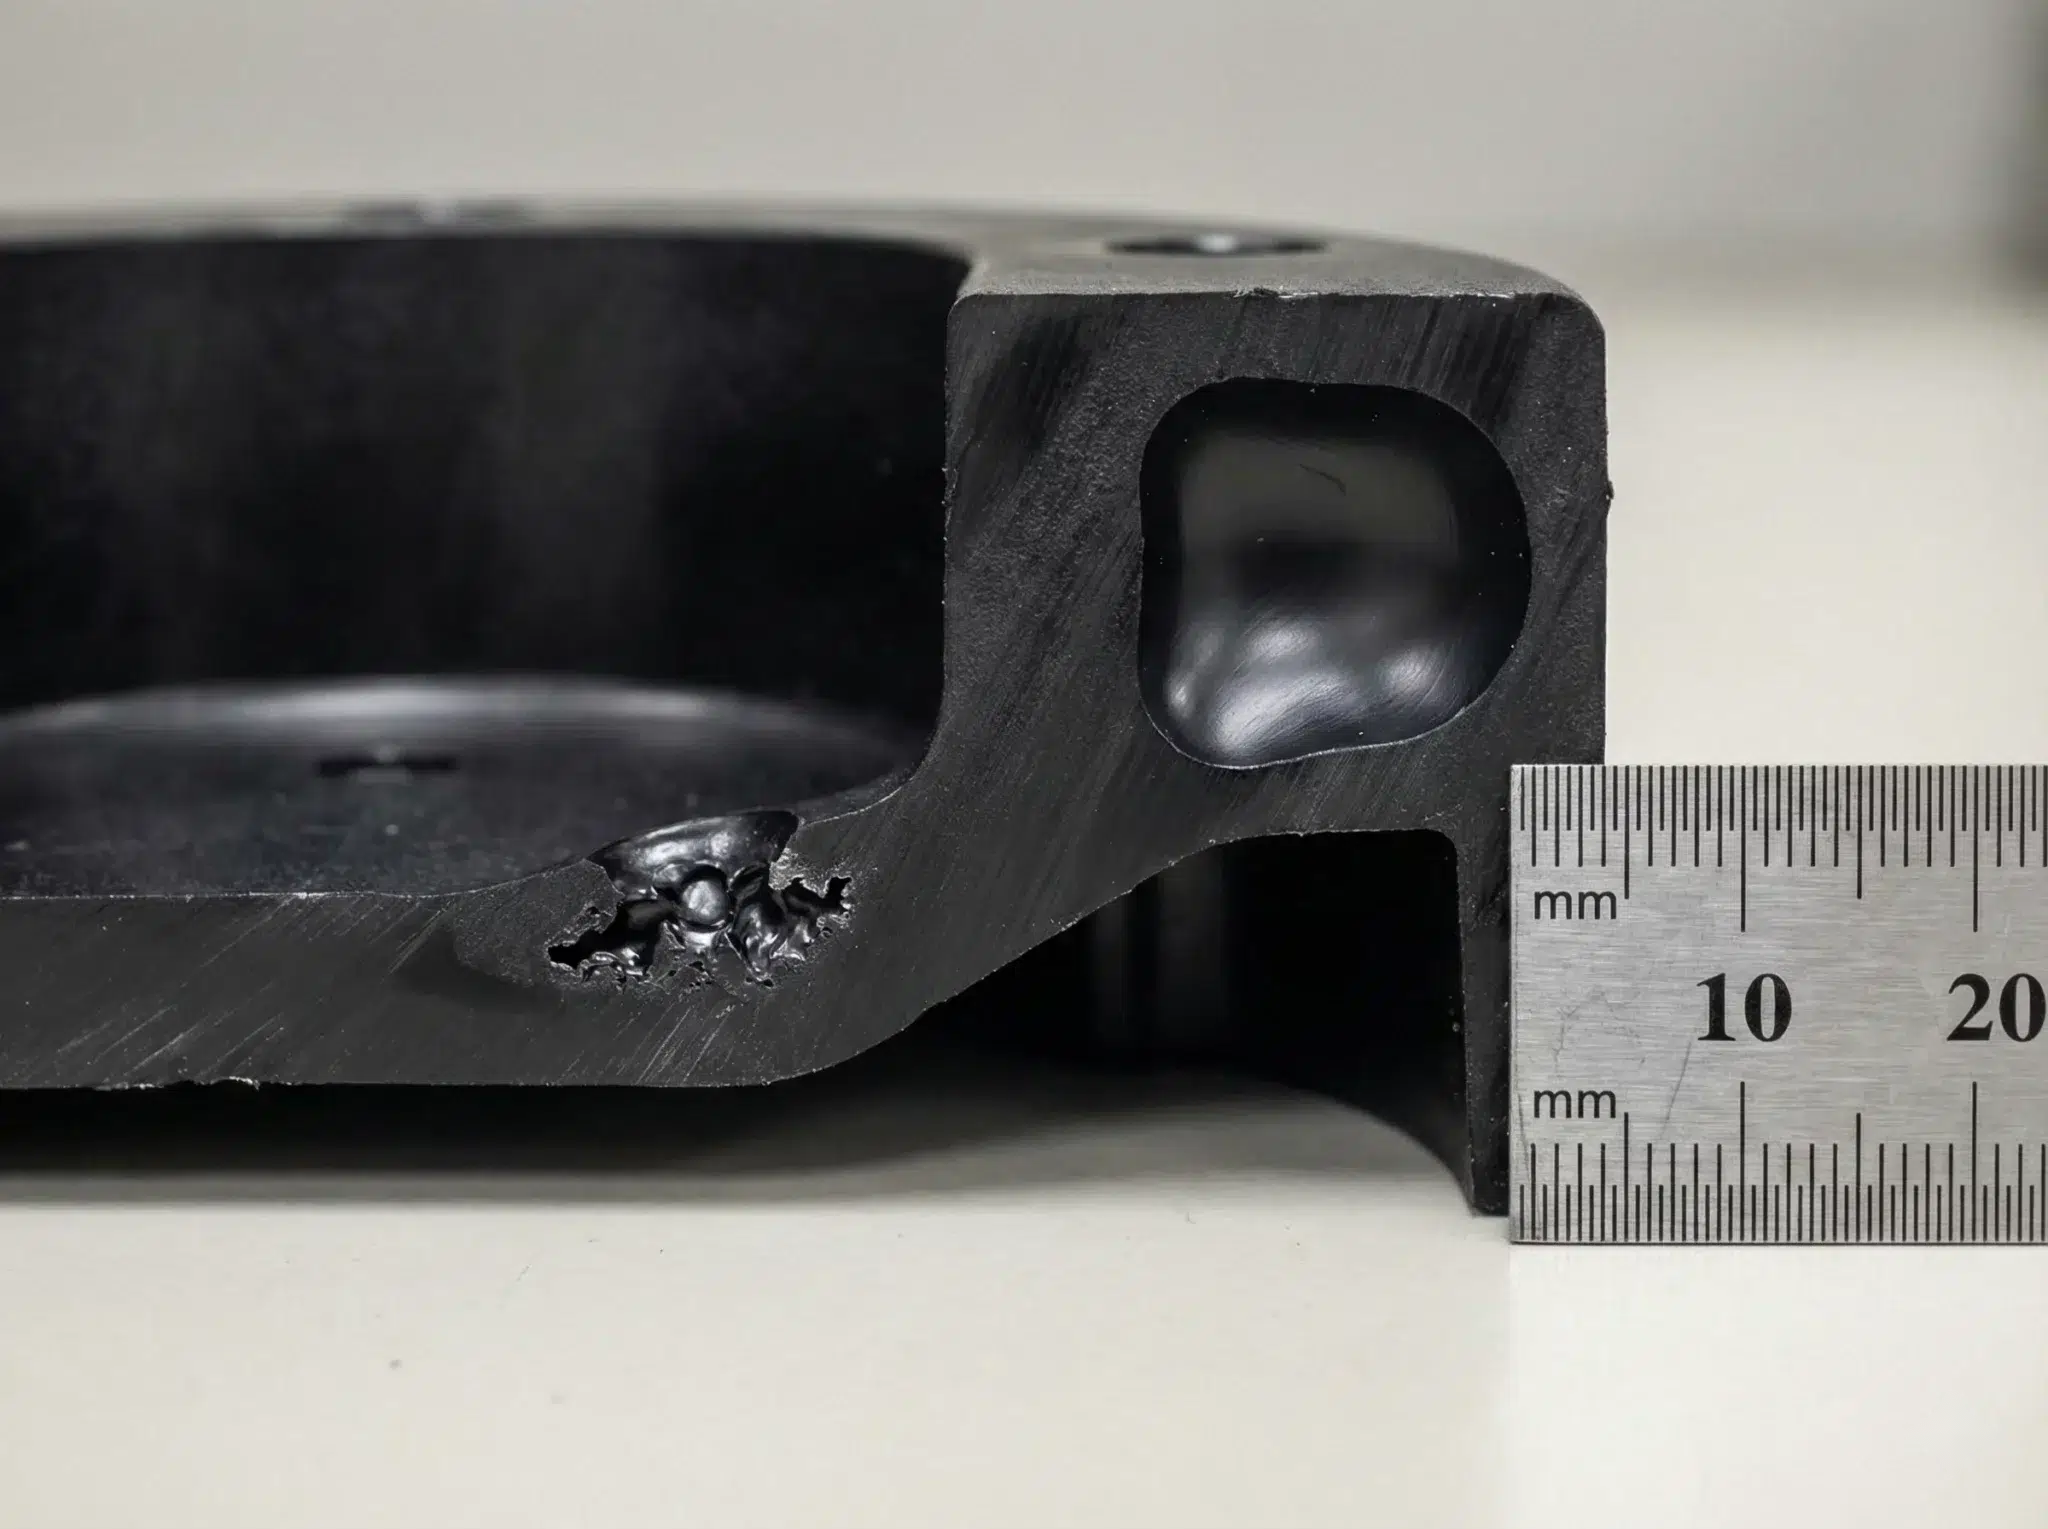
Not every bubble is a defect. In foam molding, a blowing agent creates a cellular core on purpose. But in a solid part, injection molding bubbles and voids are a warning sign, especially in seals and diaphragms, where a hidden void can become a leak path or a failure point under pressure.
When someone asks what causes bubbles in injection molding, the most useful first step is to look at where the bubbles are:
- At the end of fill, or in pockets and ribs. Air bubbles in injection molding that collect in the last areas to fill usually mean air is getting trapped. Vents may be undersized, poorly located, or blocked with residue. In compression molding, the same symptom can point to an inadequate bump (degassing) cycle.
- Deep in the center of thick sections. Porosity buried in a thick cross-section often signals undercure. The cure time may be matched to the thinner areas of the part while heat hasn’t fully reached the core. Low durometer readings in the same area usually confirm it.
- On the surface after demolding or post-cure. Blisters that appear after the part leaves the mold often come from moisture or volatiles in the compound expanding as the part heats. Material storage conditions and cure completeness are the first things to check.
- Only on parts from a specific material lot. If voids in injection molding appear when a new batch goes into the press, the compound itself, or how it was stored, is the likely cause.
For liquid silicone rubber, there’s one more possibility. Air can be introduced during mixing and metering, before the material ever reaches the mold.
Flow Lines, Knit Lines, and Short Shots in Rubber Molding
In thermoplastic molding, hot material is injected into a cooler mold. Rubber molding works the opposite way: the mold is heated, and the compound starts to cure as it flows. That makes most flow-related defects a race between how fast the cavity fills and how fast the material begins to set up, a condition called scorch.
Flow lines. Flow lines in injection molding show up as streaks or ripples that trace the path the material took through the cavity. In rubber, what causes flow lines in injection molding is usually material that has started to cure before the cavity is full. Slow injection speed, mold or barrel temperatures that run too hot, or a compound with a short scorch window can all contribute. Mold release buildup or surface contamination can create similar marks.
Knit lines and weld lines. Knit lines in injection molding form where two flow fronts meet, such as around a hole or core pin. A faint visible line isn’t always a problem. The concern is when the fronts have partially cured before they meet and don’t fully fuse. The result is a weak seam that can crack when the part flexes or compresses. Weld lines in injection molding deserve extra scrutiny on dynamic parts like boots, bellows, and diaphragms.
Short shots. A short shot in injection molding, sometimes called non-fill, leaves part of the cavity empty. Common causes include an insufficient shot size, material that cures before reaching the end of the cavity, or trapped air with nowhere to go because a vent is blocked. In compression molding, a preform that’s too light or placed off-center produces the same result.
The diagnostic split here is simple. If a flow line or knit line always appears in the same place, gate placement and part geometry are the likely drivers, which is why flow behavior is reviewed before tooling is cut. If the severity changes from run to run, look at process temperatures, injection speed, and material lot variation instead.
How Your Rubber Molding Process Shapes the Defects You See
The same defect can mean different things depending on how the part was molded. Compression, transfer, and rubber injection molding each leave their own fingerprints.
- Compression molding. Because a preform is placed between open mold halves, flash is built into the process, and overflow is part of the design. Common rubber compression molding defects include backrind, air trapped between the preform and the mold surface, and uneven thickness from inconsistent preform weight or placement.
- Transfer molding. Material is pushed through a channel into a closed cavity, so flash tends to concentrate around the transfer pad and sprue. Flow lines and knit lines become more likely as material travels farther through the channel before filling the part.
- Injection molding. This is the most consistent of the three, but it has its own failure modes. Scorch in the runner system, short shots, gate-area flow marks, and knit lines around cores are the injection molding defects we see most often.
Sometimes a recurring defect pattern is a sign that the part is running in the wrong process altogether. A complex part with persistent compression molding defects may perform better in transfer or injection molding, while a simple low-volume part may not justify the tooling investment of injection. Because Moldtech runs compression, transfer, and injection molding in the same facility, we can make that call based on the part rather than the equipment we happen to have.
How Moldtech Approaches Rubber Molding Troubleshooting
Injection molding troubleshooting only works if you can actually answer the where, when, which, and what questions with data instead of memory. That’s where our quality systems come in.
Full production traceability. Our Plex production management system ties every finished part to the machine it was molded on, the date and shift, the material lot, and the process parameters in effect at the time. When a customer flags a defect, we can pull the production record for those exact parts in minutes. That tells us whether the issue is isolated to a few parts or affects a full run, and whether it lines up with a specific press, shift, or material lot. Material lots can also be traced back to the supplier, so a compound-related issue doesn’t stop at our door.
Documented process settings. Injection pressure, cure time, mold temperature, shot size, and other critical variables are documented for every job. When a defect appears, we can compare the settings in effect against the validated process, rather than guessing what an operator may have adjusted.
In-process checks. Parts are pulled and tested at set intervals throughout a run, so drift shows up before it turns into a shipment of scrap. A process that consistently runs near the edge of a tolerance band gets attention even when every part technically passes.
Tooling knowledge under one roof. Because our tooling team works alongside the molding floor, a defect that traces back to a parting line, gate, or vent can be evaluated and corrected without waiting on an outside toolmaker.
All of this is backed by our ISO 13485 and IATF 16949 certifications, standards built around variation reduction, process consistency, and documented accountability. For customers in medical, aerospace, automotive, and defense programs, that means a defect leads to a clear answer and a corrective action, not just a sorted shipment.
Turn Rubber Molding Defects Into Answers
Flash, bubbles, flow lines, and the other common injection molding defects aren’t random. Each one points to something specific in the tooling, the material, the process, or the design. The molders who solve them fastest are the ones who can read those clues and back them up with production data.
At Moldtech, we combine nearly 50,000 square feet of vertically integrated production space in Lancaster, NY, with the traceability and process discipline needed to find root causes quickly. Whether you’re chasing a recurring defect on an existing part or want a second set of eyes on a new design, our team is ready to help.
Dealing with a defect you can’t pin down? Contact our team to talk through your part and your process.
FAQ’s
What are the most common rubber molding defects?
The most common rubber molding defects include flash, bubbles and voids, blisters, flow lines, knit lines, short shots, sink marks, backrind, and under-cure or over-cure. Each one typically traces back to the tooling, the process parameters, the material, or the part design.
What is flash in injection molding, and is it always a defect?
Flash is excess material that escapes the mold cavity and cures outside the part, usually along the parting line or around vents and ejector pins. A small amount is expected in rubber molding and is often removed through deflashing. Flash becomes a concern when its thickness, location, or frequency changes, since that usually signals a process, tooling, or material issue.
What causes bubbles in injection molding of rubber parts?
Bubbles and voids usually come from trapped air, undercure, or moisture and volatiles in the compound. Bubbles near the end of fill typically point to venting problems, porosity in thick sections often signals undercure, and surface blisters after demolding usually trace back to the material or its storage conditions.
How does traceability help with injection molding troubleshooting?
Traceability connects each part to the machine, shift, material lot, and process parameters that produced it. When a defect appears, that data shows whether the problem is isolated or widespread and which variable changed, turning troubleshooting into a data-backed root cause analysis instead of guesswork.